Nov 4, 2017

Mobile App Automation with Appium on Android Emulator/Device

Overview :-


Appium is an open source test automation tool for mobile applications. It allows you to test all the three types of mobile applications: native, hybrid and mobile web.It also allows you to run the automated tests on actual devices, emulators and simulators.

If you want to start mobile automation on Android device/emulator, first you must need to setup the Android SDK on your machine and set the paths in environment variables.Then you can create your own emulator and run the test scripts on it.

Pre-requisites :-


1. JDK installation

2. Android SDK installation and Emulator Creation

3. Appium installation

4. Native App information
  • .apk file - This is not required if you specify appPackage and appActivity capabilities
  • appPackage - Activity name for the Android activity you want to launch from your package. This often needs to be preceded by a . (e.g., .MainActivity instead of MainActivity)
  • appActivity  - Java package of the Android app you want to run


Prerequisted Jars:

  • java-client.jar - For Appium
  • selenium-server-standalone.jar - For webdriver capabilities
  • commons-validator.jar - if want to run appium server programatically

Nov 3, 2017

Install .apk file on Android Emulator

To install native app on Android Emulator, You must have installed Android SDK in your System. Please find the below steps if you want to do install on Windows/Linux.

Windows :


1. Open Command Prompt
2. Navigate to Android SDK path till platform-tools directory (C:\Android\sdk\platform-tools)
3. Run below command
  • adb install C:\Users\hbolla\AndroidApps\demoApp.apk

Linux/Mac :


1. Open Terminal
2. Navigate to Android SDK path till platform-tools directory (\users\Android\sdk\platform-tools)
3. Run below command
  • ./adb install \Users\hbolla\AndroidApps\demoApp.apk

Wait for few minutes and get success response in cmd/terminal if app is successfully installed on Emulator.

Oct 29, 2017

Setup to Run Safari on iOS real device with XCUITest

  • To able to run your tests against Safari browser on a real device you will need to install the ios-webkit-debug-proxy in your mac.
  • Turn on web inspector on iOS device (settings > safari > advanced)

Pre-Requisited installations :


1. Run below command in the terminal if you don't have brew installed on your mac.

  • ruby -e "$(curl -fsSL https://raw.githubusercontent.com/Homebrew/install/master/install)"
2. Once brew is successfully installed, run the below commands one by one.
  • npm install -g appium - To install appium
  • brew update
  • brew install ios-webkit-debug-proxy
  • brew install carthage
  • brew install libimobiledevice --HEAD
  • npm install -g ios-deploy
3. Once the above commands are successfully installed, go and check the WebdriverAgent path in where the Appium is installed.

Path : <installed location>/lib/node_modules/appium/node_modules/appium-xcuitest-driver/WebDriverAgent. 

4. Once find open a terminal and go to that location, then run the following in order to set the project up:

  • mkdir -p Resources/WebDriverAgent.bundle 
  • sh ./Scripts/bootstrap.sh -d

5. Open the WebDriverAgent.xcodeproj from WebDriverAgent folder in Xcode .


6. Select "Automatically manage signing" in the "General" tab for both the WebDriverAgentLib and WebDriverAgentRunner targets, then select your Development Team. This should also auto select the Signing Certificate.


7. If Xcode fail to create a provisioning profile for the WebDriverAgentRunner target, you need to change the bundle id for the target by going into the "Build Settings" tab.Change the "Product Bundle Identifier" from com.facebook.WebDriverAgentRunner to some other name that Xcode will accept. Then come to "General" tab and see the signing certificate.


8. Finally build the Xcode project with the connected device UDID
  • xcodebuild -project WebDriverAgent.xcodeproj -scheme WebDriverAgentRunner -destination 'id=<udid>'

How to handle location popups in Appium

Sometimes when the app/browser under test gets launched for the first time, it displays a Location permission popup or some other popups. Appium has a simple solution to solve this problem, you can use a desired capability specifically designed to handle these alerts.We can handle/ignore these popups by passing the capabilities to Appium driver.

You can either always accept or always dismiss the alerts with these desired capabilities:

Handle popups with capabilities:

  • autoAcceptAlertsAccept - All iOS alerts automatically accept if they pop up. This includes privacy access permission alerts (e.g., location, contacts, photos). Default is false
  • safariAllowPopups - (Sim-only) Allow javascript to open new windows in Safari. Default keeps current sim setting
  • safariIgnoreFraudWarning - (Sim-only) Prevent Safari from showing a fraudulent website warning. Default keeps current sim setting

       DesiredCapabilities capabilities = new DesiredCapabilities();
       capabilities.setCapability("safariAllowPopups", true);
       capabilities.setCapability("safariIgnoreFraudWarning", true);
       capabilities.setCapability("autoAcceptAlerts", true);

Handle popups with Webdriver Alert :


Another way to handle alerts with Webdriver Alert(), 

WebDriverWait wait = new WebDriverWait(driver, 1 /*timeout in seconds*/);

int waitTime =0;

while(waitTime <6){

try {

wait.until(ExpectedConditions.alertIsPresent());
 driver.switchTo().alert().accept();

 } catch (Exception eTO) {
 }
    waitTime ++;
}

Oct 28, 2017

How to run appium tests on iOS simulators

Overview :-


Appium is an open source test automation tool for mobile applications. It allows you to test all the three types of mobile applications: native, hybrid and mobile web.It also allows you to run the automated tests on actual devices, emulators and simulators.

If you want to start mobile automation on iOS device/Simulator, first you must have to setup the compatible Xcode installation on your machine and drag the Xcode app to Applications.Then launch the xcode and open simulator.

Pre-requisites :-


1. JDK installation

2. Android SDK installation and Emulator Creation

3. Appium installation


Prerequisted Jars:

  • java-client.jar - For Appium
  • selenium-server-standalone.jar - For webdriver capabilities
  • commons-validator.jar - if want to run appium server programatically

How to run run Appium tests on iOS real device

Overview :-


Appium is an open source test automation tool for mobile applications. It allows you to test all the three types of mobile applications: native, hybrid and mobile web.It also allows you to run the automated tests on actual devices, emulators and simulators.

If you want to start mobile automation on iOS device/Simulator, first you must have to setup the compatible Xcode installation on your machine and drag the Xcode app to Applications. Now connect the iPhone device to your mac and find the UDID of connected device from iTunes.


Pre-requisites :-

1. JDK installation

2. Xcode Installation

3. Appium installation

4. Setup iOS real device tests with XCUITest


Prerequisted Jars:

  • java-client.jar - For Appium
  • selenium-server-standalone.jar - For webdriver capabilities
  • commons-validator.jar - if want to run appium server programatically

Install Xcode and Launch iOS Simulator

To install Xcode on your mac, first find the compatible version of Xcode w.r.t your Mac version. If your macOS is greater than 10.12.6 then install Xcode 9 .

From AppStore : 


  • Open the App Store
  • Search 'Xcode' application
  • Download it and install
  • Drag the xcode app to Applications
  • Launch Xcode
  • Go to xcode  > Open Developer Tools > Select iOS Simulator


Run Appium tests with Selenium Grid & Node

Appium is an open source test automation tool for mobile applications and allows you to test all the three types of mobile applications: native, hybrid and mobile web on Android and iOS platforms.It also allows you to run the automated tests on actual devices, emulators and simulators.

Appium is Cross-Platform tool and allows the scripts to run on multiple platforms by using the same set of API. Appium is usually combined with Selenium for automated testing on mobile apps.


What is Selenium-Grid?


Selenium-Grid allows you run your tests on different machines against different browsers in parallel. That is, running multiple tests at the same time against different machines running different browsers and operating systems. Essentially, Selenium-Grid support distributed test execution. It allows for running your tests in a distributed test execution environment.

When to Use It?

  • To run your tests against multiple browsers, multiple versions of browser, and browsers running on different operating systems.
  • To reduce the time it takes for the test suite to complete a test pass.

Pre-Requisites : 


Selenium Grid - Hub SetUP : 


1. Open the command prompt and navigate to Selenium jar file location then run the below command to start a hub on your system
  • java -jar selenium-server-standalone-3.6.0 -role hub
2. The above command will run the selenium hub in your system ip address with the default port of 4444. You can see the below console once Hub is running successfully and up.


Appium Node Configuration SetUp :


1. The configuration of Appium Node is usually maintained with Json configuration files as shown with the following details.

{
"capabilities": [
{
"browserName": "Chrome",
"version":"8.0",
"maxInstances": 3,
"platform":"ANDROID",
"deviceName":"Android Emulator"
}
],
"configuration":
{
"nodeTimeout":120,
"port":4723,
"hubPort":4444,
"proxy": "org.openqa.grid.selenium.proxy.DefaultRemoteProxy",
"url":"http://192.168.0.20:4723/wd/hub",
"hub": "192.168.0.20:4444/grid/register",
"hubHost":"192.168.0.20",
"nodePolling":2000,
"registerCycle":10000,
"register":true,
"cleanUpCycle":2000,
"timeout":30000,
"maxSession":1

}
}

2. Copy the above configuration into notepad and save on NodeConfig.json file.

3. Open the command prompt and navigate to .json file location then run the below command to register node with running hub on your system
  • appium -p 4723  --nodeconfig NodeConfig.json
4. The above command will run the appium server in 0.0.0.0 address with the port of 4723 and register with running hub on your system. You can see the below console once Node is successfully registered with Hub.


Example :


To run appium scripts on your grid machine you have to pass the hub url in Appium driver instance creation and pass the mentioned capabilities in the node machine. Let us see the sample program to run appium test with grid configuration.


import java.net.MalformedURLException;
import java.net.URL;
import io.appium.java_client.AppiumDriver;
import io.appium.java_client.android.AndroidDriver;
import org.openqa.selenium.By;
import org.openqa.selenium.remote.CapabilityType;
import org.openqa.selenium.remote.DesiredCapabilities;
import org.testng.Assert;
import org.testng.annotations.AfterSuite;
import org.testng.annotations.BeforeSuite;
import org.testng.annotations.Test;

public class MobileBrowserTest {

DesiredCapabilities capabilities;
static AppiumDriver driver = null;

@BeforeSuite
public void setup() throws MalformedURLException{

capabilities = new DesiredCapabilities(); 
capabilities.setCapability("deviceName", "Android Emulator");
capabilities.setCapability(CapabilityType.BROWSER_NAME, "Chrome");
capabilities.setCapability(CapabilityType.VERSION, "8.0"); 
capabilities.setCapability("platformName", "Android");

driver = new AndroidDriver(new URL("http://192.168.0.20:4444/wd/hub"), capabilities);

}

@Test
public void TC1(){


driver.get("https://www.google.co.in");
driver.findElement(By.name("q")).sendKeys("Welcome");

}

@AfterSuite
public void tearDown(){

if(driver!=null)
driver.quit();

}


}


Oct 25, 2017

Start and Stop appium server with AppiumDriverLocalService and Terminal/CMD

We can start and stop appium server without having a GUI  in 3 different ways.

1. By using AppiumDriverLocalService with buildDefaultService
2. By using AppiumDriverLocalService with customized buildService
3. By using command through CMD/Terminal

To start/stop appium server by using this approach, appium has to be installed in your machine. If it is not installed, install it by following the below links.

Pre-Requisites:


1. java-client.jar
2. Selenium-server-standalone.jar
3. commons-validator.jar

Example with buildDefaultService:


Let us see the sample program to run appium server programatically with AppiumDriverLocalService. In this approach driver will invoke with the default address and port .

import java.net.MalformedURLException;
import java.net.URL;
import io.appium.java_client.AppiumDriver;
import io.appium.java_client.android.AndroidDriver;
import io.appium.java_client.service.local.AppiumDriverLocalService;
import org.openqa.selenium.By;
import org.openqa.selenium.remote.CapabilityType;
import org.openqa.selenium.remote.DesiredCapabilities;
import org.testng.Assert;
import org.testng.annotations.AfterSuite;
import org.testng.annotations.BeforeSuite;
import org.testng.annotations.Test;

public class MobileBrowserTest {

DesiredCapabilities capabilities;
AppiumDriverLocalService appiumServer;
static AppiumDriver driver = null;

@BeforeSuite
public void setup(){
// Start Appium Server
appiumServer = AppiumDriverLocalService.buildDefaultService();
appiumServer.start();
capabilities = new DesiredCapabilities(); 
capabilities.setCapability("deviceName", "Nexus_Emulator");
capabilities.setCapability(CapabilityType.BROWSER_NAME, "chrome");
capabilities.setCapability(CapabilityType.VERSION, "8.0"); 
capabilities.setCapability("platformName", "android"); 
    
try {
 String hubURL = appiumServer.getUrl().toString();
  driver = new AndroidDriver<>(new URL(hubURL), capabilities);
} catch (MalformedURLException e) {
e.printStackTrace();
Assert.fail("Failed to create a session, Check the appium adress and port");
}
}
@Test
public void TC1(){
driver.get("https://www.google.co.in");
driver.findElement(By.name("q")).sendKeys("Welcome");
}
@AfterSuite
public void tearDown(){
if(driver!=null)
driver.quit();
//Stop Appium server
appiumServer.stop();
}
}


Example with buildService:


import java.io.File;
import java.net.MalformedURLException;
import java.net.URL;
import io.appium.java_client.AppiumDriver;
import io.appium.java_client.android.AndroidDriver;
import io.appium.java_client.service.local.AppiumDriverLocalService;
import io.appium.java_client.service.local.AppiumServiceBuilder;
import org.openqa.selenium.By;
import org.openqa.selenium.remote.CapabilityType;
import org.openqa.selenium.remote.DesiredCapabilities;
import org.testng.Assert;
import org.testng.annotations.AfterSuite;
import org.testng.annotations.BeforeSuite;
import org.testng.annotations.Test;

public class MobileBrowserTest {
DesiredCapabilities capabilities;
AppiumDriverLocalService appiumServer;
AppiumServiceBuilder serviceBuilder;
static AppiumDriver driver = null;

@BeforeSuite
public void setup(){

//Store appium console log in txt file
File logFile = new File("E:\\Docs\\AppiumLogFile.txt");
capabilities = new DesiredCapabilities(); 
capabilities.setCapability("deviceName", "Nexus_Emulator");
capabilities.setCapability(CapabilityType.BROWSER_NAME, "chrome");
capabilities.setCapability(CapabilityType.VERSION, "8.0"); capabilities.setCapability("platformName", "android");
// Start Appium Server
serviceBuilder = new AppiumServiceBuilder()
.withIPAddress("0.0.0.0")
.usingAnyFreePort()
.withCapabilities(capabilities)
.withLogFile(logFile);

appiumServer = AppiumDriverLocalService.buildService(serviceBuilder);
appiumServer.start();
 
try {
String hubURL = appiumServer.getUrl().toString();
driver = new AndroidDriver<>(new URL(hubURL), capabilities);
} catch (MalformedURLException e) {
e.printStackTrace();
Assert.fail("Failed to create a session, Check the appium adress and port");
}
}
@Test
public void TC1(){
driver.get("https://www.google.co.in");
driver.findElement(By.name("q")).sendKeys("Welcome");
}
@AfterSuite
public void tearDown(){
if(driver!=null)
driver.quit();
//Stop Appium server
appiumServer.stop();

}
}

Oct 24, 2017

Mobile Browser Automation with Appium on Android Real Device

Overview :-


Appium is an open source test automation tool for mobile applications. It allows you to test all the three types of mobile applications: native, hybrid and mobile web.It also allows you to run the automated tests on actual devices, emulators and simulators.

If you want to start mobile automation on Android device/emulator, first you must need to setup the Android SDK on your machine and set the paths in environment variables.Then you can attach the device and run on it.

Pre-requisites :-


1. JDK installation

2. Android SDK installation and Set Paths in Environment variables

3. Appium installation

Prerequisted Jars:

  • java-client.jar - For Appium
  • selenium-server-standalone.jar - For Webdriver capabilities
  • commons-validator.jar -  if want to run appium server programatically

How to know the list of available emulators and connected devices

To find the list of available emulators in your system, follow the below steps.


1. Open the command prompt  / terminal
2. Navigate to android sdk path upto the tools folder (E:\Android_Studio\tools) and run the below command

  • emulator -list-avds


To find out list of connect devices in your system, follow the below steps.


1. Open the command prompt / terminal
2. Navigate to android sdk path upto the platform-tools folder (E:\Android_Studio\platform-tools) and run the below command

  • adb devices


Android Emulator Creation

To create Android Emulator on your system, first install Android Studio into your system. 

Follow the below steps to create an android emulator using Android Studio.

1. Download Android Studio and install it ( Follow the link if it is not installed in your system Android Studio Installation)

2. Open Android Studio and start a new Android Studio project


3. Once created project successfully, open the AVD manager from intelliJ toolbar


4. Create a new virtual device from the AVD manager


5. Select device category from the category list and choose the model whatever you want


6. Download the packages for whatever version you want and select it and then click on Next


7. Give Android Emulator name in the AVD Name tab and Finish it. It will create a new emulator with the given info and add to AVD manager.


8. Click on 'Play' button to launch the emulator.

Note : If you are not able to launch the emulator when you click on 'Play' button, close the avd manager and restart the studio and try again. If it it is still not able to launch, Update the Ram Size to 700 MB in the "Show Advanced Settings" (6th Step) and try to launch again.

Oct 19, 2017

Android SDK Installation

1. Go to Android studio home page and download the latest studio


2. Run downloaded .exe and install it on specific location wherever you want.


3. Go to installed location and check the Android folder
4. Go to bin folder and run "studio64.exe" if your system is compatible with 64-bit.
5. Then you can see the "Android Studio" window


5. Click on "Configure" dropdown and open SDK manager. Check the Android SDK location and Install whichever package you want.


6. After all the packages are successfully installed, you need to set the SDK path in environment variables.


  • Create new user variable with ANDROID_HOME and the set the value for it upto Android SDK location (e.g.: E:\Android_Studio)


  • Set paths of tools and platform-tools in the system variable Path:
    • Path of “platform tools” folder in the SDK (e.g.: E:\Android_Studio\platform-tools)
    • Path of “tools” folder in SDK (e.g.: E:\Android_Studio\tools)

Oct 17, 2017

Appium Installation and start with Desktop UI

Appium Desktop provides a GUI for the Appium Server. You can able to start and stop the server manually by using this GUI tool and able to see the logs in the same window for every action what you perform.

It also providing an Inspector, which enables you to check out the hierarchy of your app or web application. This can come in handy when writing tests.

Follow the below steps to install Appium Desktop GUI and start a session with appium server on Android emulator.


1. Download Appium desktop GUI from Appium downloads page and install it. For Windows, download .exe and .dmg for Mac.


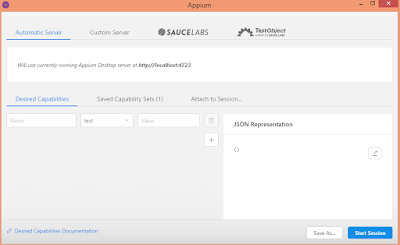
2. Run Appium.exe, you can see below window


3. Start appium session by clicking on "Start Inspector Session" icon, then you can see the new window to pass desire capabilities to start appium server with respective Android Emulator


4.  Add capabilities in the JSON Representation or in the Desire Capabilities tab like below
    • platformName - "Android" or "iOS"
    • platformVersion - "<Android Version>" or "iOS Version"
    • deviceName - "Android Emulator"  or "Android" or "iPhone" or "iPad"
    • browserName - "Browser", or "Chrome" or "Safari"


.


5. Now start the session by clicking on "Start Session" button, it will enable android emulator and invoke the browser

Install Appium with terminal on MAC by using node.js

Appium is a server written in Node.js. It can be built and installed directly from NPM. To install it, First you need to have brew installed in your machine then install the node by using brew and finally install the appium server from npm.

Follow the below commands to install appium on your mac.


1. Run below command in the terminal if you don't have brew installed on your mac.
    • ruby -e "$(curl -fsSL https://raw.githubusercontent.com/Homebrew/install/master/install)"

2. Run below commands step by step in the terminal to install appium on back end in your system
    • brew install node
    • npm install -g appium
    • npm install wd

Check appium is installed in your machine by following the below step


    • Open terminal
    • Type 'appium' and press enter
    • You can see the below one if appium is installed successfully on your machine

Appium installation with command line on Windows by using node.js

Appium is a server written in Node.js. It can be built and installed directly from NPM. You can able to start and stop the server without GUI help and able to see the logs in the same command prompt for every action what you perform.

To install it, First install the node.js then install the appium server from npm.

Follow the below steps to install appium on your Winodws.


1. Download latest node.js MSI from node.js website and install it. This will also installs node’s npm tool (node package manager) which we will use to install Appium Server. Once install, it will automatically set the path in environment variables.


2. After node.js installation, run the below commands step by step in command prompt to install the appium on back end in your system
    • npm install -g appium
    • npm install wd

Check appium is installed in your machine by following the below step


    • Open command prompt
    • Type 'appium' and press enter
    • You can see the below one if appium is installed successfully on your machine


Java Installation on Windows

JDK Installation :

1. Open browser
2. Go to Java download page
3. Check the 'Accept Licence Agreement' button
4. Click on respective JDK download link w.r.t sytem type (x64 or x86)


5. Choose the folder location and save .exe
6. Run .exe file and install java
7. Go to installed location and check java folder

Set JAVA PATH in environment variables


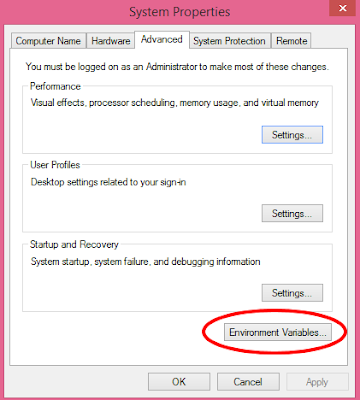
  • Go to system properties
  • Select Advanced tab
  • Click on "Environment Variables" button


  • Set JAVA_HOME in system environment variables


  • Enter the variable name as JAVA_HOME and the value upto your jdk path


  • Edit the path in system variables and add java bin path in the value like %JAVA_HOME%/bin


Check JAVA is installed in your machine by following the below steps :


  • Go to command prompt
  • Type "java -version" (make sure java path set in environment variables, if not follow above steps)
  • You can see the below one if java successfully installed on your machine


Oct 10, 2017

Mobile Browser Automation with Appium on Android Emulator

Overview :-


Appium is an open source test automation tool for mobile applications. It allows you to test all the three types of mobile applications: native, hybrid and mobile web.It also allows you to run the automated tests on actual devices, emulators and simulators.

If you want to start mobile automation on Android device/emulator, first you must need to setup the Android SDK on your machine and set the paths in environment variables.Then you can create your own emulator and run the test scripts on it.

Pre-requisites :-


1. JDK installation

2. Android SDK installation and Emulator Creation

3. Appium installation

Prerequisted Jars:

  • java-client.jar - For Appium
  • selenium-server-standalone.jar - For webdriver capabilities
  • commons-validator.jar - if want to run appium server programatically

Mobile App Automation with Appium on Android Emulator/Device

Overview :- Appium  is an open source test automation tool for mobile applications. It allows you to test all the three types of mobile...